ESC32 V2 Calibrations
To use all AutoQuad ESC32v2 features calibrations are required. The calibration measures and calculates drive characteristics and must therefore be performed for every different motor, propeller and voltage (LiPo cell count) combination.
모든 AutoQuad ESC32v2 특징을 이용하기 위해서는 정밀 조정(calibration)이 필요합니다. 정밀 조정은 측정하고 구동 특성을 계산합니다. 그러므로 모든 서로 다른 모터, 프로펠러 그리고 전압(LiPo 셀의 수)의 조합에 대해서 수행해야 합니다.
On a ESC32 V2, there are two different calibrations, the current limiter calibration and the feed forward calibration. The current limiter calibration is required for the virtual current limiter which performs better than the standard PI controller. The feed forward calibration is required for the closed loop control modes (RPM and thrust).
ESC32 V2 상에 2가지 정밀 조정 방법이 있습니다. current limiter calibration과 feed forward calibration. current limiter calibration은 표준 PI 제어기보다 잘 동작하는 가상의 current limiter를 위해서 요구됩니다. feed forward calibration는 폐루프 제어 모드(RPM and thrust)를 위해 필요합니다.
You can find more info on ESC32 Current limiter calibration here
Prerequisites
- Attach your motor with prop on a non movable surface and make sure the motor is attached so it can’t move. 움직이지 않는 표면에 프롭을 장착하여 고정합니다. 모터가 움직일 수 없는지 확인합니다.
- Use fresh lipo’s. 새 LiPo를 사용하세요.
- use the prop you intend to use otherwise the data will not be valid. 사용하고자 하는 프롭을 사용합니다. 그렇지 않으면 데이터는 유효하지 않을 것입니다.
- Be careful!!! both calibrations will ramp up the motor output to max so use a wide open space without audience presence. 주의하세요!!! 두 정밀 조정은 모터 출력을 최고로 올릴 것입니다. 그러므로 사람이 없는 넓은 공간에서 해야 합니다.
Calibration with QGroundControl
Connect the ESC32 using your FTDI interface to the computer and start QGCS. Make sure the AutoQuad widget is visible in the engineering tab. Click on Esc32 Settings.
컴퓨터에 여러분의 FTDI 인터페이스를 사용해서 ESC32를 연결하고 QGCS를 실행시킵니다. AutoQuad 위젯이 engineering tab에 보여야 하고 ESC32 설정을 클릭합니다.![]()
Proceed with connecting the esc32 by clicking on the ‘connect esc32’ button. That one!!, make sure you did NOT use any other connect button only that one.
'connect esc32' 버튼을 클릭해서 ESC32를 연결을 진행합니다. 여러분은 다른 버튼을 사용하지 말고 오직 'connect esc32' 버튼을 사용하세요.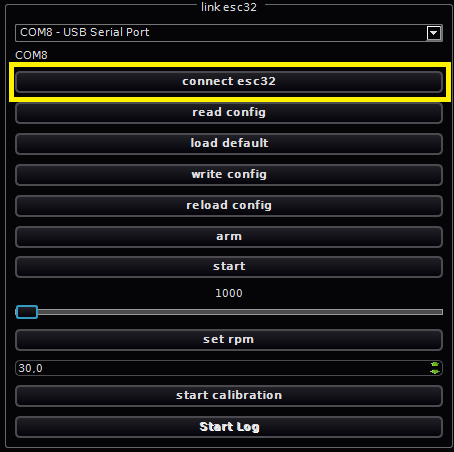
To set the maximum current to use in the calibrations you can adjust the default (20A) to any number. It will probably be good practice to start low and watch the first calibration. If you table, motor and room is still intact you can set a higher number.
정밀 조정에서 사용할 최대 전류를 설정하기 위해서 여러분은 디폴트(20A)를 다른 숫자로 조정할 수 있습니다. 이것은 아마도 낮게 시작하고 첫번째 정밀 조정을 볼 수 있는 좋은 예가 될 것입니다. 만일 여러분이 안정되면 모터와 공간은 변화 없이 더 큰 숫자를 설정할 수 있습니다.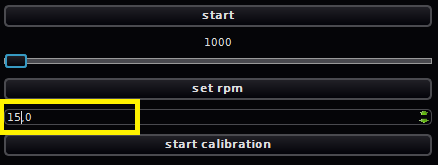
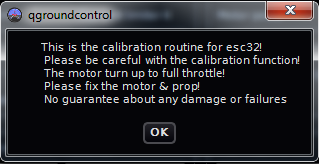
Final check and click on ‘start calibration’. The following warning will be displayed.
'start calibration'을 클릭합니다. 다음의 경고가 표시될 것입니다.
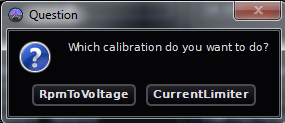
Next you can select the two calibrations. Select the one you need (or do both).
다음 여러분은 2가지 정밀 조정을 선택할 할 수 있습니다. 여러분이 필요한 하나를 선택하세요(혹은 둘다).

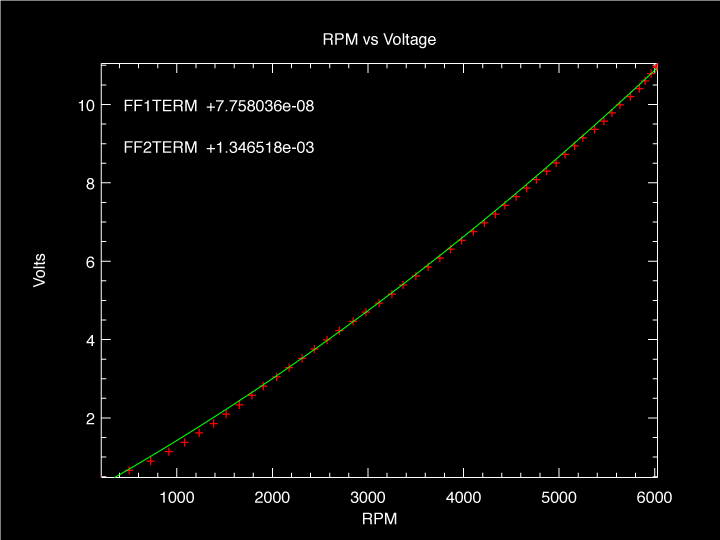
The calibration will now start and take some time. The calibration sequence will ramp up the duty cycle in several steps and measure rpm, current, duty cycle and voltage. It can produce output like this if you graph the data (next versions or if you use the linux version with plplot). In the current QGCS a comma separated file is generated in the QGCS directory that can be imported into a spreadsheet program.
정밀 조정은 지금 시작하고 시간이 소요됩니다. 정밀 조정 절차는 몇 개의 단계로 듀티 사이클을 올리고 rpm, 전류, 듀티 사이클 그리고 전압을 측정할 것입니다. 이것은 여러분이 데이터를 그래프로 그린다면 (다음 버젼 혹은 plplot의 리눅스 버젼을 사용한다면) 이와 같은 결과를 만들 것입니다. 현재의 QGCS에서 콤마로 분리된 파일이 QGCS 디렉토리에 생성되고 이는 스프레드시트 프로그램에서 읽어 들일 수 있습니다.
After the calibration the current limiter (1-5) or FF (1-2) data is displayed and entered in the Esc32 PID screen.
정밀 조정 후에 current limiter (1-5) 혹은 FF (1-2) 데이터는 보여지고 Esc32 PID 화면으로 들어갑니다.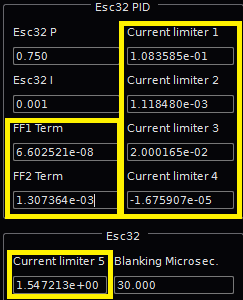
Now click on ‘write config’ to save them to the ESC32 memory.
이들은 ESC32 메모리에 저장하기 위해서 'write config'를 클릭합니다.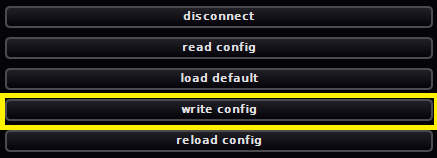
Final check. Click on disconnect esc32 and again on connect esc32 for a definitive check if the values have been stored to flash and can be retrieved by using connect esc32
'disconnect esc32' 버튼을 클릭합니다. 그리고 값이 제대로 플래시 메모리에 저장되었는지는 확인하기 위해서 다시 'connect esc32' 버튼을 클릭합니다.

| You have to manually enter the calibration data in your other esc32’s. 다른 esc32에는 정밀조정한 데이터를 수동으로 입력해야 합니다. |
Calibration via command line (Ubuntu)
When using the QGCS, the executables for calibration are in the software, but when using the commandline binaries on linux or OSx you need to compile them.
Prerequisites
- ESC32 source on the google code page
- eigen3 development library for your distro
- plplot development library for your distro
Install the required packages
sudo apt-get install subversion build-essential libplplot-dev libeigen3-dev
Add the current user to the dialout group to run esc32Cal as normal user
sudo usermod -a -G dialout $USER
After the next login esc32Cal can be run as normal user.
Checkout the latest ESC32 code
svn checkout http://esc32.googlecode.com/svn/trunk/ esc32
Edit Makefile (esc32/ground) to adapt Eigen3 library path
esc32Cal.o: esc32Cal.cc esc32.h
$(CC) -c $(ALL_CFLAGS) esc32Cal.cc -I/opt/local/include -I/usr/include/eigen3
Compile esc32Cal
make esc32Cal
Note: The warnings can be ignored!
Available Parameters
| –cl | Current Limiter calibration |
| –r2v | Feed Forward calibration (RPM to Voltage) |
| -a amps | Limits current during calibration |
| -p device | USB to TTL converter port |
| -b baud | Baud rate |
| -t file | Telemetry output file |
The device port (-p switch) must be set and depends on the used converter (“dmesg” can help to indetify the port). It’s important to limit the maximum current (-a switch) to match the drive combination (motor/propeller/voltage). A value to high can burn the motor or ESC! Ctrl+C can be used to terminate esc32Cal.
Current Limiter calibration
./esc32Cal --cl -p /dev/ttyUSB0 -a 15
At the end of the calibration the CLxTERM values are displayed:#define DEFAULT_CL1TERM +3.358974e-01
#define DEFAULT_CL2TERM +1.124178e-03
#define DEFAULT_CL3TERM +3.390607e-02
#define DEFAULT_CL4TERM -3.829096e-05
#define DEFAULT_CL5TERM +1.367444e+00
Feed Forward calibration
./esc32Cal --r2v -p /dev/ttyUSB0 -a 15
At the end of the calibration the FFxTERM values are displayed:#define DEFAULT_FF1TERM +8.008604e-08
#define DEFAULT_FF2TERM +1.249541e-03
'Radio Control > ESC' 카테고리의 다른 글
| ESC32 - config (0) | 2020.04.29 |
|---|---|
| ESC32 V2 메뉴얼 - Configuration & Modes (0) | 2020.04.24 |
| ESC32 V2 메뉴얼 - Firmware Flashing (0) | 2020.04.23 |
| ESC32 V2 메뉴얼 - Connections & Wiring (0) | 2020.04.03 |
| BitWizard ESC의 소개 (0) | 2018.12.03 |
